
Right Right Right...... my three little cuties!!!
Beside taking them outside to play, to visit, to shopping, to swim, to enjoy the sunshine in the yard, there must some time we need to stay inside, why???? Because the bad weather or mom is really exhausted or tons of housework need to be done! So what should they do at home?
One day we did shopping in Dollarama, the kids are looking at some simple crafty items, I can tell: first not expensive, second easy to do, third (I guess) they probably can sit still for at least one hour.
OK! Buy it!
This is one of the crafty items we bought - Paracord Bracelet / Paracord Ankle Bracelet Kit. It comes with 4 different colors paracord and 4 black curved side release plastic buckles.

These are 550 paracord, the kids are easy to do the knotting as it is quite thick. (compared with the Chinese knotting cord I have)
Let's start! Oh oh oh......forget to mention, my kids are 9 and 4, the younger one can do the knotting but need my help to do the tightening.
Normally, one foot of cord is needed for one inch of the bracelet, that means 10 inches of wrist measurement need 10 feet of cord. But I don't follow this rule, because my daughters prefer the bracelet to be loose rather than fit.
The basic knot of making the paracord bracelet is square knot. And I am going to use two different colors of cord to demonstrate how to do the knotting, at least I think it is more easier to understand.
First, you have to join the cords together by melting the both end with the lighter and quickly put the melted ends together. Be careful the melted ends are really hot and should be done by adults only.

Take the centre of the cord and pull it through either side of the buckle and form a loop. Then pull the end of the cord to the loop we just formed and tighten it.

Pull the free ends of the cord through the other side of the buckle. As I mentioned before, I don't follow the measurement rule. What I do is after pull the free ends through the buckle, I wrap it around my daughter's wrist, make sure that is the length she wants, then unclip the buckle. (It should be able to fit a finger between the cord and the wrist) Or after I done the first bracelet, I just need to follow the same length by laying both on a flat working surface. That's it! That's my own way!

Starting knotting!!!!
It doesn't matter starting the left side or right side first.
Taking the yellow cord and place it over the centre strands. Then taking the pink cord, pass it on the yellow cord and place under the centre strands, then pass through the loop of the yellow cord. Tighten the cords just next to the buckle.

Let me explain more here. Most people like starting from the left side, actually I don't know why, I can start either side, only concern the bracelet colors arrangement. Take this as an example, I want the middle color is yellow and side color is pink, so I need to place the yellow cord on top of the centre cord, it makes sense, right? So, I just need to keep placing the yellow cord on top in every knotting, I teach my kids this way in knotting, they are easier to understand and they are not mess up with the cords.
Also, at the beginning knot, I like taking the yellow cord and place it over, not under, the centre cord because it is easier for me to hold the cords.

Keep Keep Keep Knotting............
Until you reach the other side of buckle.....
Remember tie the knot in the same tension so that it look more beautiful.

When you reach the other side of buckle, you have to trim the excess cords close to the last knot, melt it with lighter and press it on the surrounding cords to secure it.
Now you know the basic paracord bracelet knotting, square knot, you can do a lot of variations and color combinations, or even add some elements in it, like beads, ribbons, chains....it is totally up to your design and flavour. Enjoy.
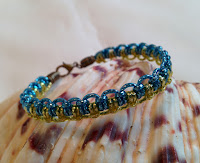
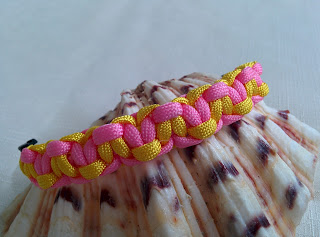
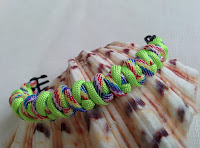
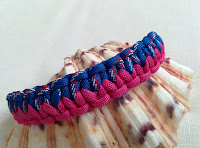
Here are some of the Paracord Bracelet / Friendship Bracelets my eldest daughter made!
 |
 |
 |
 |
 |
 |
 |
 |
 |
Thanks for visiting my blog.
No comments:
Post a Comment